Pages

Wednesday 28 August 2024

Stampin' Up! Coastal Cabana


Welcome to a Week 18 of the Colour Creations Showcase blog hop. This week we continue our journey through the remaining Stampin' Up! core colours, working in alphabetical order, with this week's feature colour being Coastal Cabana. Coastal Cabana is a member of the Brights colour group and is classified as a Blue-Green colour.


Once again I have used this opportunity to create another Christmas card as well as have a play with another new bundle of products soon to be available after September 4th. This time it's the Decorative Trees bundle and I have chosen to pair Coastal Cabana with Pretty Peacock, White and touches of Copper.


The paper attached to the card base is what I would term the reverse side of one of the pieces of the Nests of Winter DSP and features Coastal Cabana. I have simply just sponged the edges of this.

Next a piece of White card has been randomly stamped in Coastal Cabana using the small star bundle stamp from the Decorative Trees stamp. The card has then been embossed using the Snowflake Sky 3D embossing folder (apologies for it's prolific use lately but it just seems to suit the cards best). 


For the two outer trees, the outline and foliage have been stamped using Pretty Peacock ink and the Decorative Trees stamps. These have then been die cut using the dies from the Decorative Trees dies. 

For the central tree the outline is also in Pretty Peacock but the sentiment, also from the same stamp set, and the foliage have this time been embossed in White. 

Each of the trees is decorated using the Oxidized Copper Specialty Paper, for the stars, baubles, garlands and other decorations. The dies for each of these are from the Decorative Trees Dies. As so many of these are fine the Oxidized Copper paper was attached to Adhesive Sheets to make it easier to adhere to the tree. 


Hopefully this photo shows the variation in the Oxidized Copper paper with its shine and matte areas. Finally a few Copper Adhesive Backed Metallic Gems were added.

Next in tonight's blog hop is our lovely host Cathy Proctor. I look forward to seeing her lovely creation this week.


If the "next" button link is not working or you would like to see a full list of participants then you can hop over to our host  Cathy Proctor  where you can see a full list of tonight's participants.

It is quite possible that this might be my last Colour Creations blog post for the year as I am about to pack up my crafting supplies to go into storage for preparation to move to our new home in Regional Victoria. 

As always if you live in Australia and would like to know more about Stampin' Up! or would like to purchase some of the products then click on the Facebook tab at the top of the page and send me a message.

As always enjoy your week.

Theresa
 

Monday 26 August 2024

AWH Heart of Christmas Week 4


Welcome to Week 4 of the Art With Heart, Heart of Christmas. This year we will be hopping weekly, so hopefully we can provide you with some festive inspiration. Our host for this year's blog hop is the lovely Sharon Davern. 

Finally my preorder has arrived and I have managed to have a play with some of the gorgeous new goodies for this week's blog hop. I've gone with a traditional colour combination of Real Red, Mossy Meadow and Old Olive.


 A piece of white card that has been stamped using the Sketched Plaid background stamp and Real Red ink has been adhered to the Real Red card base. I have then embossed a piece of Graceful Greenery Vellum using the Snowflake Sky 3D Embossing folder and carefully adhered this to the Sketched Plaid background being careful where to place the glue. 


Each of the trees from the Peaceful Evergreen stamp set were stamped in Old Olive and Mossy Meadow and then die cut using the dies from the Peaceful Evergreen dies. These were then adhered to the vellum. 

Using White and Real Red card for the definition, the word Christmas was die cut using the Peaceful Season dies. For the word "Merry" it was stamped in Versamark and embossed in White and then also die cut. 

Some Real Red and White Bakers Twine was wrapped around the top of the card and a bow also adhered. Trick- another place to adhere the glue to the vellum without being seen!

I've coloured a few Iridescent Pearls using a Real Red Stampin Blend and added a star die cut using some of the Cherry Cobbler Glimmer paper.


As the card base is Real Red, I've added a piece of White card die cut using one of the Deckled Rectangles and stamped the sentiment from Peaceful Season in Real Red and some trees from Peaceful Evergreen in Old Olive. 

Next on tonight's blog hop is the lovely Vicki Boucher. Click on the button below and it should take you to her blog where you can see her lovely Festive creation.


If the button link is not working or you would like to see the entire list of participants go to our lovely host  Sharon Davern's blog.

If you live in Australia and would like to know more about Stampin' Up! or to purchase products from me then click on my Facebook button above and send me a message and I would be more than happy to help.

Enjoy your week.

Theresa


Wednesday 21 August 2024

Stampin' Up! Cherry Cobbler


Welcome to a Week 17 of the Colour Creations Showcase blog hop. This week we continue our journey through the remaining Stampin' Up! core colours, working in alphabetical order, with this week's feature colour being Cherry Cobbler. Cherry Cobbler is a member of the Regals group of colours and is classified as a Red Violet colour.


As Cherry Cobbler is a red colour and commonly used in Christmas creations that is what I have gone with too.  My preorder has finally arrived and this week I have had fun playing with one of the new bundles from the Upcoming Mini Catalogue, the very cute Reindeer Fun. Cherry Cobbler has been teamed with Very Vanilla and Crumb Cake.


To start with a piece of Very Vanilla card has been stamped using Crumb Cake ink and the star stamp from Reindeer Fun. It was then embossed using the Snowflake Sky 3D embossing folder and then die cut using the circular die from the Reindeer Fun dies. This has been adhered to a piece of soon to be released Splendid Autumn paper featuring Cherry Cobbler. 


The cute little Reindeer, also from /reindeer Fun, has been stamped in Early Espresso and then coloured using Crumb Cake Stampin Blends. It was then die cut. The bridle has been stamped using Cherry Cobbler ink.

Although hard to tell from the original photo, the sentiment, from Greetings Of the Season has been embossed in gold and then die cut using one of the Nested Essentials dies.


Finally a few Gold Blooming Pearls have been added for that bit of Christmas bling. 

The inside has been kept very simple by just stamping the bells from Reindeer Fun and colouring them with Cherry Cobbler and Wild Wheat Stampin Blends and then die cutting them. I wish that Stampin Up would have Gold and Silver blends.


Next in tonight's blog hop is the lovely Vicki Boucher. I look forward to seeing her lovely creation this week.


If the "next" button link is not working or you would like to see a full list of participants then you can hop over to our host  Cathy Proctor where you can see a full list of tonight's participants.

As always if you live in Australia and would like to know more about Stampin' Up! or would like to purchase some of the products then click on the Facebook tab at the top of the page and send me a message.

As always enjoy your week.

Theresa


Monday 19 August 2024

AWH Heart of Christmas Week 3


Welcome to Week 3 of the Art With Heart, Heart of Christmas. This year we will be hopping weekly, so hopefully we can provide you with some festive inspiration. Our host for this year's blog hop is the lovely Sharon Davern. 

Whilst awaiting delivery (yes I was a bit slow off the mark) of my Demonstrator only preorder from the new September to December mini catalogue I have decided to revisit one of the bundles that has carried over into the current Annual Catalogue, Merriest Trees along with a beautiful paper that has also carried over, Winter Meadow.


I've gone for a non-traditional colour scheme so as to match the paper, of Lost Lagoon and Pretty Peacock and a lot of Silver bling!

The paper used for the card base is an Online Exclusive, Tartan Foil, in Lost Lagoon. A piece of the Winter Meadow paper, featuring the same two colours has then been added on top along with a couple of strips of Silver Foil.

The Christmas tree, from Merriest Trees, has been stamped in Lost Lagoon with the accents being stamped in Pretty Peacock and then die cut using one of the Merriest Trees dies.

The tree basket has been die cut using Pebbled Path card and the die from Merriest Trees. All of the ornaments have been stamped in Versamark and then embossed in Silver and then die cut using the die. Lucky there are actually 3 of the same dies for the ornaments so making it easier. It's a bit like our tree usually is heavily laden with ornaments. The garland has also been die cut using Silver foil but this time I used Adhesive Sheets on the back making it easier to adhere to the tree. 


For the sentiment the word "Celebrate" has been die cut using a die from Wanted To Say and Silver Foil. This has then been paired with the word "Christmas", which has been stamped in Lost Lagoon.

A few of the Tinsel Gems in Lost Lagoon have also been added.

For the inside of the card, the sentiment, also from Merriest Trees has been stamped in Pretty Peacock and a strip of the Lost Lagoon Tartan Foil added to the bottom. 


Next on tonight's blog hop is the lovely Christine Blain . Click on the button below and it should take you to her blog where you can see her lovely Festive creation.


If the button link is not working or you would like to see the entire list of participants go to our lovely host Sharon Davern's blog.

 If you live in Australia and would like to know more about Stampin' Up! or to purchase products from me then click on my Facebook button above and send me a message and I would be more than happy to help.

Enjoy your week.

Theresa


Wednesday 14 August 2024

Stampin' Up! Calypso Coral


Welcome to a Week 16 of the Colour Creations Showcase blog hop. This week we continue our journey through the remaining Stampin' Up! core colours, working in alphabetical order, with this week's feature colour being Calypso Coral. Calypso Coral  is a member of the Subtles group of colours and is on the cusp of Red Orange and Orange on the Stampin' Up! Colour Wheel.


This week I have chosen to feature one of the Stampin' Up bundles that has been a round for a few Catalogues now but one that I haven't used for some time and what's more I have, strange for me, decided to team Calypso Coral with Pretty Peacock. 


The paper adhered to the White card base is from Lily Pond Lane. I have then used a different paper, from the Online Exclusive, Delightful Floral and the Countryside Corners dies to cut the hexagonal frame.

Inside the hexagonal frame is a piece of white card that has been embossed using the Eyelet 3D embossing folder. To this I have added the floral arrangement. As the Pretty Peacock flower stem is quite fine I added adhesive sheet to the back before die cutting it. The flowers have been stamped in Calypso Coral with Petal Pink used for the "fill". These were then die cut using the dies from the Sentimental Park dies.


It's a bit hard to see from the original photo but the flower centres have been highlighted using Wink of Stella which is a bit easier to see in this photo above. 

The sentiment is from Charming Duck Pond and has been stamped in Pretty Peacock and then die cut using another of the Countryside Corners dies. 

Finally a few flowers using more of the Delightful Floral paper and the Sentimental Park small flower dies have been added to the corners. Iridescent Pearls have been coloured using Calypso Coral Stampin' Blends and adhered to the centres. 


The inside of the card has been kept quite simple, just a small piece of the flower stem in Pretty Peacock and a flower stamped in Calypso Coral and coloured using a Calypso Coral Stampin' Blend. 

Next in tonight's blog hop is our talented  host Cathy Proctor . I look forward to seeing her lovely creation this week.


If the "next" button link is not working or you would like to see a full list of participants then you can hop over to our host  Cathy Proctor  where you can see a full list of tonight's participants.

As always if you live in Australia and would like to know more about Stampin' Up! or would like to purchase some of the products then click on the Facebook tab at the top of the page and send me a message.

As always enjoy your week.

Theresa


Monday 12 August 2024

AWH Heart of Christmas Week 2


Welcome to Week 2 of the Art With Heart, Heart of Christmas. This year we will be hopping weekly, so hopefully we can provide you with some festive inspiration. Our host for this year's blog hop is the lovely Sharon Davern. 

Seeing Rosa's cards last week reminded me that I still had some of the Shining Christmas Specialty paper left from last year. So whilst waiting for my demonstrator only preorder of the brand new mini to arrive I decided to have a play with it.


The paper has been used for the base of the card and the inside. Although my photo doesn't quite show it, one side of each of these papers has a lovely shine to it. This was mounted onto a piece of Cherry Cobbler card and then finally white. 

The bare trees have been die cut using one of the dies from the Frosted Forrest dies, which are part of an Online Exclusive bundle, consisting of a stamp set, dies and Decorative Masks. The trees were die cut using Mossy Meadow card.Also a bit hard to see in my photo but the ends of the branches have been sponged with Mossy Meadow ink.

The truck, from the Trucking Along stamp set, has been stamped using Cherry Cobbler ink and the outline in Black Memento. It was then punched out using the coordinating punch. A couple of Basic Gray Pearls were added to the wheel centres. 

The Christmas tree in the boot of the truck has been stamped in Old Olive with Mossy Meadow accents. 


All of this has been adhered to a piece of White card that has been embossed using one of the Basics 3D Embossing folders and then die cut using a Deckled Rectangle die. 

Once again it is hard to see from the photo but I have scattered splotches of both Smoky Slate and Wink of Stella onto the white background. The thought was to emulate snow falling. Not so sure it did that but it added interest to the background!

The sentiment also from the Trucking Along stamp set has been stamped in Cherry Cobbler onto White and then die cut using one of the Stylish Shapes dies. A couple of Cherry Cobbler Pearls have been added. 


Another piece of the Shining Christmas Specialty paper has been added to the inside but this time using one of the matt sided pieces. The intention is to stamp a greeting onto the white card when I receive my preorder. 

Next on tonight's blog hop is our lovely  team leader Claire Daly . Click on the button below and it should take you to her blog where you can see her lovely Festive creation.


If the button link is not working or you would like to see the entire list of participants go to our lovely host  Sharon Davern's blog.

 If you live in Australia and would like to know more about Stampin' Up! or to purchase products from me then click on my Facebook button above and send me a message and I would be more than happy to help.

Enjoy your week.

Theresa

Wednesday 7 August 2024

Stampin' Up! Cajun Craze


Welcome to a Week 15 of the Colour Creations Showcase blog hop. This week we continue our journey through the remaining Stampin' Up! core colours, working in alphabetical order, with this week's feature colour being Cajun Craze. Cajun Craze  is a member of the Regals group of colours and is classified as a red orange colour sitting between Calypso Coral and Copper Clay on the Stampin' Up! colour wheel.
 

 This week I have chosen to feature another of the newer Online Exclusive bundles, Changing Leaves, which consists of a stamp set, coordinating dies, and a hybrid embossing folder. To me this bundle seemed the obvious choice as I see Cajun Craze as an Autumnal colour. When searching for some inspiration I came across this colour combination from Brian King.
 

I have to say I am actually rather happy with the way this combination turned out.


My starting point was to stamp the leaf in  the upper right in Black Memento and die cut it,  and then colour it using Misty Moonlight, Pecan Pie and Cajun Craze Stampin Blends. The original intention was to colour it randomly but in the end my OCD brain preferred the more orderly version.
 
Each of the other leaves were then stamped in Cajun Craze and Misty Moonlight and then die cut using the larger of the Changing Leaves dies.

Each of the leaves were then mounted using dimensionals onto a piece of white card that has been embossed using the Changing Leaves Hybrid Embossing folder. Each of them were mounted onto the corresponding embossed leaf. 


This was then mounted onto a piece of Misty Moonlight card and then Cajun Craze card. Some Linen Thread was wrapped several times around the card. 

The sentiment, also from Changing Leaves has been stamped Cajun Craze onto white card and die cut using one of the Changing Leaves dies. Finally a few Copper coloured Neutrals Adhesive Backed Sequins were added.

 
The inside of the card was kept simple by just adding a couple of die cut leaves using Misty Moonlight and Cajun Craze card.
 
 Next in tonight's blog hop is our talented  host Cathy Proctor. I look forward to seeing her lovely creation this week.


If the "next" button link is not working or you would like to see a full list of participants then you can hop over to our host Cathy Proctor where you can see a full list of tonight's participants.

As always if you live in Australia and would like to know more about Stampin' Up! or would like to purchase some of the products then click on the Facebook tab at the top of the page and send me a message.

As always enjoy your week.

Theresa


Monday 5 August 2024

AWH Heart of Christmas Week 1


Welcome to another year of the Art With Heart, Heart of Christmas. This year we will be hopping weekly, so hopefully we can provide you with some festive inspiration. Our host for this year's blog hop is the lovely Sharon Davern. I have to say how lovely is our header?


For my first card of this year's blog hop I have chosen one of the new Suites of products that are currently available as Online Exclusives, The Season of Green and Gold Suite. The Suite features gorgeous papers, vellums, 2 stamp sets, Golden Greenery and Greetings of the Season, Vanilla ribbon and Adhesive Backed Berry embellishments. The greens featured are Garden Green, Mossy Meadow and Old Olive.


 The card base is Mossy Meadow and to this I have added a piece of the Season Of Green and Gold Specialty Designer Series Paper.

For the pine fronds two options have been used. For one, the fronds were stamped in 2 steps using Mossy Meadow and Old Olive and the Golden Greenery stamp set, and then die cut using the dies from the Golden Greenery dies. Beautifully the same dies coordinate with the printed Golden Greenery Vellum and have been used to cut out more of the fronds. 

These have then been mounted onto a piece of White card that has been embossed using the Fern 3D Embossing folder and then die cut using one of the Spotlight On Nature dies. This has then been mounted onto a piece of Mossy Meadow card that has also been die cut using another one of the Spotlight on Nature  dies.

The bells atop of the Pine fronds have been stamped in Wild Wheat onto white card and the second part of the image embossed using gold. As is great there is also a die in the Golden Greenery dies to cut the bells.

The bow on top of the this arrangement has been die cut using the bow die from the Country Birdhouse and Cherry Cobbler card. 

The sentiment, from Greetings of the Season, has been also embossed in gold although it is not as easy to see. The panel has been die cut using one of the Greeting of the Season dies, and a couple of single Cherry Cobbler Adhesive Backed Pearls added.


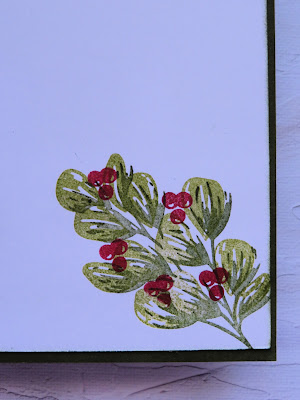
As the card base is Mossy Meadow and quite dark for writing to be seen, I have added a piece of white card that has been sponged around the edges using Mossy Meadow ink and then added another 2 step image from the Golden Greenery stamp set using Mossy Meadow and Old Olive, and added a few clusters of berries stamped in Cherry Cobbler.


Next on tonight's blog hop is the lovely Kate Morgan. Click on the button below and it should take you to her blog where you can see her lovely Festive creation. 


If the button link is not working or you would like to see the entire list of participants go to our lovely host Sharon Davern's blog.

 If you live in Australia and would like to know more about Stampin' Up! or to purchase products from me then click on my Facebook button above and send me a message and I would be more than happy to help.

Enjoy your week.

Theresa