Pages

Wednesday, 20 March 2024

Stampin' Up! Shaded Spruce


This week, is week  45 in the Colour Creations blog hop and this week we continue our journey through the existing Stampin' Up! core colours, working in alphabetical order. This week our feature colour is  Shaded Spruce, a member of the Regals family of colour.


Shaded Spruce isn’t a green that I tend to use very much and so when planning my card I had to search possible colour combinations. One that was suggested was Shaded Spruce, Soft Sea Foam and Gold, which really appealed to me. Naturally I have also added Basic White to the mix. The bundle that has been chosen for this colour combination is the Notes Of Nature bundle from the current mini catalogue .


The paper used on the card base is from Natures Sweetness which I also from the same suite of products as the Notes Of Nature bundle. It features white and gold so the perfect choice. The paper has been embossed using the Timeworn Type embossing folder.
The gold paper circle that is underneath the foliage has been cut using the Distressed Gold Specialty Paper and a Deckled Circle die. 

Two types of foliage have been used. One is a stamped image from the Notes of Nature bundle, using Black Memento and then coloured in Shaded Spruce and Soft Sea Foam using Stampin Blends. These images have then been die it using one of the dies from the Notes Of Nature die set. For the other foliage the long Notes of Nature die has been used with either Shaded Spruce or Soft Sea Foam card. As the image is very long it has been cut into 2 pieces. The remains as you will see have been used on the inside of the card.


The sentiment is also from the Notes of Nature stamp set and been embossed in gold although it is hard to see in the photo.

Finally a couple of Brushed Metallic Adhesive Backed Dots in gold have been added.

 
As you can see the inside has been decorated using some of the leftover bits and pieces of paper and die cuts.
 
 Next in tonight's blog hop is our talented blog hop host Catherine Proctor . I look forward to seeing this week's beautiful creation. 


If the "next" button link is not working or you would like to see a full list of participants then you can hop over to our host  Catherine Proctor  where you can see a full list of tonight's participants.

As always if you live in Australia and would like to know more about Stampin' Up! or would like to purchase some of the products then click on the Facebook tab at the top of the page and send me a message.

As always enjoy your week.

Theresa


Wednesday, 13 March 2024

Stampin' Up! Real Red


This week, is week  44 in the Colour Creations blog hop and this week we continue our journey through the existing Stampin' Up! core colours, working in alphabetical order. This week our feature colour is  Real Red, a member of the Regals family of colour and is a bright vivid red that to me invokes Love.


For my card this week I have had a play with another product from the current Mini  catalogue, the Adoring Hearts Hybrid Embossing folder along with a new Online Exclusive stamp set, Sweetly Scripted. I have teamed Real Red with the simple Black and White.


For the background a piece of the Rock and Roll Designer Series Paper has been embossed using only the embossing folder of the Hybrid bundle. Those little hearts are just too cute. 

Two methods have been used to create the hearts that have been adhered to the embossed piece of paper. The simplest way, used to create the solid Real Red heart, in the middle on the right side, is to simply emboss and cut a piece of Real Red card. The die consists of one large die with nine hearts and lots of smaller hearts and adornments. When using the large nine heart die with the embossing folder , it "locks"into place. Thus allowing you to emboss and cut at the same time. 

For the other five hearts Real Red ink is applied to the embossing folder using a brayer. The large multiple hearts die is then "locked" into place on the embossing folder and put through the Stampin' Cut and Emboss machine in one pass. This method creates die cut white hearts with accents in Real Red. 


This close up shows all the embossing in more detail.

The sentiment, from the new online exclusive Sweetly Scripted has been stamped in Black Memento on white card. Two strips of Real Red card that have been die cut using the longest of the Darling Details dies have been adhered to the edges of the sentiment panel. 

Finally a bow in Black and White Gingham and a few Black Adhesive Backed Sparkle Gems have been added.

Rather than leaving the inside of the card plain white, some of the left over embossed and coloured hearts have been added to the bottom edge. 


 Apologies for the blurriness. 

Next in tonight's blog hop is the talented  Sharon Davern. I look forward to seeing this week's beautiful creation. 


If the "next" button link is not working or you would like to see a full list of participants then you can hop over to our host Catherine Proctor where you can see a full list of tonight's participants.

As always if you live in Australia and would like to know more about Stampin' Up! or would like to purchase some of the products then click on the Facebook tab at the top of the page and send me a message.

As always enjoy your week.

Theresa

Wednesday, 6 March 2024

Stampin' Up! Pumpkin Pie


This week, is week  43 in the Colour Creations blog hop and this week we continue our journey through the existing Stampin' Up! core colours, working in alphabetical order. This week our feature colour is  Pumpkin Pie, a member of the Brights family of colour and is similar to the colour of a Pumpkin as the name suggests.


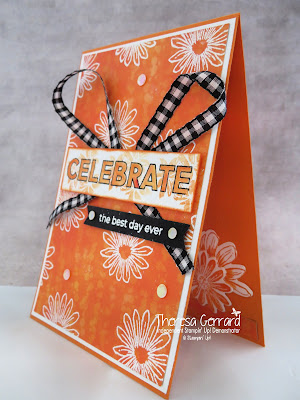
 For this week's card I have gone back and revisited the gorgeous Cheerful Daisies bundle as well as a new Online Exclusive bundle, Happy Little Things, and teamed Pumpkin Pie simply with Black and White and used lots of embossing, which happens to be one of my favourite techniques. I just love watching the embossing powder melt when heat is applied. So effective. 


For the background I have selected a piece of the Stargazing Designer Series Paper and stamped one of the Cheerful Daisies stamps multiple times using Versamark. The daisies have then been embossed in White. Given the paper has multiple shades this was thought to be enough for the background. 

A large bow using Black and White Gingham has been placed under the sentiment panel.

Both of the sentiments are from the new online exclusive bundle, Happy Little Things. The stamp set has largish words in both outline and solid that can be matched with smaller phrases. In this case the outline stamp has been embossed in Black. Strange but true, I don't own Pumpkin Pie Stampin' Blends so I have used Blender Pens and a Pumpkin Pie ink pad to lightly colour the infill of the sentiment. 


 On closer inspection it appears that I may have accidentally knocked off some of the embossing powder on each end of the word "Celebrate". Before stamping "Celebrate" another Cheerful Daisies stamp was stamped off several times  using Pumpkin Pie.  

The smaller of the sentiments has been embossed in White on Black cardstock and then die cut using one of the Happy Little Things dies. 

Finally a few Adhesive Backed Shiny Sequins in Pumpkin Pie have been added for some bling.

For the inside of the card a couple of different Daisies also from the Cheerful Daisies stamp set have been stamped in Pumpkin Pie on White and die cut, along with a leftover strip of the Paper used on the front of the card. 


Next in tonight's blog hop is the talented  Christine Blain. I look forward to seeing this week's beautiful creation. 


If the "next" button link is not working or you would like to see a full list of participants then you can hop over to our host  Catherine Proctor where you can see a full list of tonight's participants.

As always if you live in Australia and would like to know more about Stampin' Up! or would like to purchase some of the products then click on the Facebook tab at the top of the page and send me a message.

As always enjoy your week.

Theresa