Pages

Wednesday 13 March 2024

Stampin' Up! Real Red


This week, is week  44 in the Colour Creations blog hop and this week we continue our journey through the existing Stampin' Up! core colours, working in alphabetical order. This week our feature colour is  Real Red, a member of the Regals family of colour and is a bright vivid red that to me invokes Love.


For my card this week I have had a play with another product from the current Mini  catalogue, the Adoring Hearts Hybrid Embossing folder along with a new Online Exclusive stamp set, Sweetly Scripted. I have teamed Real Red with the simple Black and White.


For the background a piece of the Rock and Roll Designer Series Paper has been embossed using only the embossing folder of the Hybrid bundle. Those little hearts are just too cute. 

Two methods have been used to create the hearts that have been adhered to the embossed piece of paper. The simplest way, used to create the solid Real Red heart, in the middle on the right side, is to simply emboss and cut a piece of Real Red card. The die consists of one large die with nine hearts and lots of smaller hearts and adornments. When using the large nine heart die with the embossing folder , it "locks"into place. Thus allowing you to emboss and cut at the same time. 

For the other five hearts Real Red ink is applied to the embossing folder using a brayer. The large multiple hearts die is then "locked" into place on the embossing folder and put through the Stampin' Cut and Emboss machine in one pass. This method creates die cut white hearts with accents in Real Red. 


This close up shows all the embossing in more detail.

The sentiment, from the new online exclusive Sweetly Scripted has been stamped in Black Memento on white card. Two strips of Real Red card that have been die cut using the longest of the Darling Details dies have been adhered to the edges of the sentiment panel. 

Finally a bow in Black and White Gingham and a few Black Adhesive Backed Sparkle Gems have been added.

Rather than leaving the inside of the card plain white, some of the left over embossed and coloured hearts have been added to the bottom edge. 


 Apologies for the blurriness. 

Next in tonight's blog hop is the talented  Sharon Davern. I look forward to seeing this week's beautiful creation. 


If the "next" button link is not working or you would like to see a full list of participants then you can hop over to our host Catherine Proctor where you can see a full list of tonight's participants.

As always if you live in Australia and would like to know more about Stampin' Up! or would like to purchase some of the products then click on the Facebook tab at the top of the page and send me a message.

As always enjoy your week.

Theresa

Wednesday 6 March 2024

Stampin' Up! Pumpkin Pie


This week, is week  43 in the Colour Creations blog hop and this week we continue our journey through the existing Stampin' Up! core colours, working in alphabetical order. This week our feature colour is  Pumpkin Pie, a member of the Brights family of colour and is similar to the colour of a Pumpkin as the name suggests.


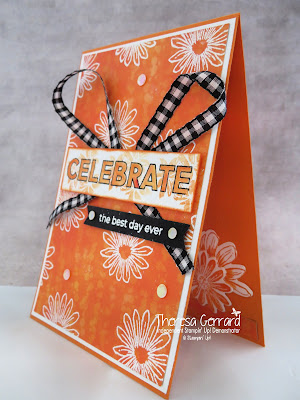
 For this week's card I have gone back and revisited the gorgeous Cheerful Daisies bundle as well as a new Online Exclusive bundle, Happy Little Things, and teamed Pumpkin Pie simply with Black and White and used lots of embossing, which happens to be one of my favourite techniques. I just love watching the embossing powder melt when heat is applied. So effective. 


For the background I have selected a piece of the Stargazing Designer Series Paper and stamped one of the Cheerful Daisies stamps multiple times using Versamark. The daisies have then been embossed in White. Given the paper has multiple shades this was thought to be enough for the background. 

A large bow using Black and White Gingham has been placed under the sentiment panel.

Both of the sentiments are from the new online exclusive bundle, Happy Little Things. The stamp set has largish words in both outline and solid that can be matched with smaller phrases. In this case the outline stamp has been embossed in Black. Strange but true, I don't own Pumpkin Pie Stampin' Blends so I have used Blender Pens and a Pumpkin Pie ink pad to lightly colour the infill of the sentiment. 


 On closer inspection it appears that I may have accidentally knocked off some of the embossing powder on each end of the word "Celebrate". Before stamping "Celebrate" another Cheerful Daisies stamp was stamped off several times  using Pumpkin Pie.  

The smaller of the sentiments has been embossed in White on Black cardstock and then die cut using one of the Happy Little Things dies. 

Finally a few Adhesive Backed Shiny Sequins in Pumpkin Pie have been added for some bling.

For the inside of the card a couple of different Daisies also from the Cheerful Daisies stamp set have been stamped in Pumpkin Pie on White and die cut, along with a leftover strip of the Paper used on the front of the card. 


Next in tonight's blog hop is the talented  Christine Blain. I look forward to seeing this week's beautiful creation. 


If the "next" button link is not working or you would like to see a full list of participants then you can hop over to our host  Catherine Proctor where you can see a full list of tonight's participants.

As always if you live in Australia and would like to know more about Stampin' Up! or would like to purchase some of the products then click on the Facebook tab at the top of the page and send me a message.

As always enjoy your week.

Theresa

Wednesday 28 February 2024

Stampin' Up! Pretty Peacock


This week, is week  42 in the Colour Creations blog hop and this week we continue our journey through the existing Stampin' Up! core colours, working in alphabetical order. This week our feature colour is  Pretty Peacock, a member of the Regals family of colours and to be completely honest one of my least favourite colours. 


This week I have chosen to use another bundle from the current mini catalogue, Lovely and Sweet. I have teamed Pretty Peacock with Lost Lagoon, Gold, White and a touch of Bubble Bath.


The main image, from the Lovely and Sweet stamp set, has been stamped in Versamark on White cardstock and then embossed in gold. The flower centres have been lightly coloured using Bubble Bath Stampin Blends. The image has then been die cut using the matching die from the Lovely and Sweet dies. This has then been mounted onto a piece of Masterfully Made Designer Series Paper.


After embossing a piece of White cardstock using one of the Basics 3D embossing folders, available exclusively online, I adhered this to the Pretty Peacock card base. 

Between the embossed White base and the Masterfully Made DSP I have added a piece of the Most Adored Specialty DSP which has been lightly coloured using Lost Lagoon and Bubble Bath Stampin'  Blends. This has been adhered to a a couple of strips of Distressed Gold Specialty paper. 

Wrapped around the band of the card is a piece of Lost Lagoon Bordered Ribbon as well as piece of Gold Simply Elegant Trim. Tinsel Gems Four Pack in Pretty Peacock have also been added to the flower centres and the card base. 

The sentiment, from the Something Fancy stamp set, has been white embossed onto Lost Lagoon card and die cut using one of the Something Fancy dies. 

To decorate the inside of the card I have stamped another image from the Lovely and Sweet stamp set using gold embossing and colouring with Lost Lagoon and Bubble Bath Stampin' Blends.


 Next in tonight's blog hop is the talented Sharon Davern. I look forward to seeing this week's beautiful creation.  


If the "next" button link is not working or you would like to see a full list of participants then you can hop over to our host  Cathy Proctor  where you can see a full list of tonight's participants.

As always if you live in Australia and would like to know more about Stampin' Up! or would like to purchase some of the products then click on the Facebook tab at the top of the page and send me a message.

As always enjoy your week.

Theresa

Wednesday 21 February 2024

Stampin' Up! Poppy Parade


This week, is week  41 in the Colour Creations blog hop and this week we continue our journey through the existing Stampin' Up! core colours, working in alphabetical order. This week our feature colour is  Poppy Parade, a member of the Brights family of colours and a vibrant red colour as the name suggests.


Once again I am having a play with some of the beautiful new products from the current mini catalogue and also one of the freebies that you can earn during Saleabration when you spend $90 or more. In this case though it was actually a bundle of stamp set and Embossing folder when you spend $180.

I have chosen to feature the Hooray For Surprises bundle for my card and teamed Poppy Parade with Flirty Flamingo, Mossy Meadow and Old Olive.


The flowers have been stamped in Poppy Parade and Flirty Flamingo onto white card and then die cut using the matching die from the Hooray For Surprises dies. To add dimension they have been popped up on dimensionals. I ahve added some Wink of Stella to the flowers but it was too hard to photograph and all it appears to have done on the Poppy Parade flower is make the ink bleed rather than add shimmer.

The leaves behind have been die cut also using one of the dies from the same set, using Mossy Meadow and Old Olive cardstock. Underneath all of this is some Silver Simply Elegant Trim.

This arrangement has been mounted onto a piece of white cardstock that has been dry embossed using the Saleabration Softly Sophisticated Embossing Folder.

The sentiment is also from the Hooray For Surprises stamp set and has been embossed in white onto Poppy Parade card and then backed with some Flirty Flamingo card. Both have been die cut using one of the Thoughtful Expressions dies (also another new product from the mini).

Finally I have added a few Basic Pearls that have been coloured using a Poppy Parade Stampin Blend and then mounted all of this onto Flirty Flamingo card and finally Poppy Parade card. 


For the inside of the card I have used a smaller floral die also from the Hooray For Surprises dies, using Poppy Parade and Flirty Flamingo card. The leaves like the outside are in Old Olive. 

The sentiment is also from the stamp set Hooray For Surprises and has been stamped in Poppy Parade. 

Next in tonight's blog hop our the talented host Cathy Proctor . I look forward to seeing this week's beautiful creation.  


If the "next" button link is not working or you would like to see a full list of participants then you can hop over to our host   Cathy Proctor  where you can see a full list of tonight's participants.

As always if you live in Australia and would like to know more about Stampin' Up! or would like to purchase some of the products then click on the Facebook tab at the top of the page and send me a message.

As always enjoy your week.

Theresa


Wednesday 14 February 2024

Stampin' Up! Pool Party


This week, is week  40 in the Colour Creations blog hop and this week we continue our journey through the existing Stampin' Up! core colours, working in alphabetical order. This week our feature colour is  Pool Party, a member of the Subtles family of colours. 


This week I have had a lovely play with some more of the new products from the current mini. This time the Lighter Than Air Suite of products. The colours that feature in this suite of products are beautiful pastel colours including this week's feature colour, Pool Party. The stamp set and die bundle feature Hot Air Balloons. 


The background paper is what I would call the reverse side of a piece that features hot air balloons, one of which I have added to the inside of the card. The paper features each of the colours used in this suite. 

For the clouds at the bottom of the card I have used one of the Basic Borders dies and White cardstock. The other standalone clouds are die cut using one of the dies from the Hot Air Balloon dies. 

For the larger of the Hot Air Balloons I heat embossed using white powder on Pool Party cardstock. For the scalloped decorative centre I used white cardstock and one of the dies from the Hot Air Balloons dies. The sweet little basket is also a die from the set. 

For the smaller heart shaped balloon I have used Pool Party card and white card for the feature. 

The sentiment is also from the Hot Air Balloon stamp set and has been stamped in Pool Party ink onto white card. It has been die cut using one of the Stylish Shapes dies. 

Finally I have added some of the Bakers Twine in Flirty Flamingo and Lemon Lime Lolly. The gems on the balloons are from one of the Saleabration freebies, Opaque Faceted Gems., as are the gems on the striped paper. The gems on the sentiment panel are from the Tinsel Gems.


For the inside of the card I have used the Wanted To Say dies and a scrap of the background paper I had for the outline and Pool Party card for the detailed letters. As mentioned the cute balloon is from the Lighter Than Air paper and I have used one of the dies from the Hot Air Balloon dies to cut it. 

Next in tonight's blog hop is the talented Christine Blain. I look forward to seeing this week's beautiful creation.  


If the "next" button link is not working or you would like to see a full list of participants then you can hop over to our host Cathy Proctor where you can see a full list of tonight's participants.

As always if you live in Australia and would like to know more about Stampin' Up! or would like to purchase some of the products then click on the Facebook tab at the top of the page and send me a message.

As always enjoy your week.

Theresa


Wednesday 7 February 2024

Stampin' Up! Petal Pink


I know it's been quite a while since I participated in the Art With Heart Colour Creations Showcase but well, what can I say, but life got pretty hectic over the festive season but hopefully I will now be back on a regular basis.

This week, is week  39 in the Colour Creations blog hop and this week we continue our journey through the existing Stampin' Up! core colours, working in alphabetical order. This week our feature colour is  Petal Pink, a member of the Subtles family of colours. I know the name of the colour includes the word pink but to me this colour is more like a pale apricot.


 Being a demonstrator I was fortunate enough to be able to place a preorder for some of the gorgeous new products in the current mini, which by the way, for every $90 you spend you get the opportunity to earn a free Saleabration product. As I said earlier having time restrictions I had been unable to have a play with any of the lovely new products but finally I have for my card this week. In particular the Bee Mine Suite of products.


Both of the papers used in the background are from the Bee Mine Designer Series Paper. These have been mounted onto a piece of Petal Pink cardstock and a band of Petal Pink ribbon, from the Ribbon Duo Combo pack in the Annual Catalogue wrapped around.

The stamped central panel has been die cut using one of the Everyday Details dies and White cardstock. The flower stem images are from the Bee Mine Valentine stamp set and have been stamped in Lemon Lime Twist for the stems and Petal Pink and Sweet Sorbet for the flowers in a 2 step process.

Isn't the bee so cute? This is also part of the same suite of products, with the stamp also from the Bee My Valentine set and it has a matching punch. The punch not only includes the bee body but also a heart shape which has been used for the bee wings. This has been stamped in Petal Pink and Black memento inks. 

The sentiment is also from the Bee My Valentine stamp set and has been white embossed onto Petal Pink cardstock and then die cut with the smallest of the circular Everyday Details dies. 

Can you also see the cute little bow on the left of the card. For this I have used 2 strands of White Bakers Twine, one of which I have coloured Petal Pink using a Stampin Blend.


It's a bit hard to see from the photo above but the flower centres are actually also from the same suite of products and are the Adhesive Backed Hearts and Flowers which are a shiny epoxy but the photo doesn't really show this. I have also added a couple of the Sweet Sorbet Hearts.

In an endeavour to use more of my scraps of Designer Series Papers I have added a band to the inside of the card. It also helps to fill the white space.

Next in tonight's blog hop is the lovely Rachel Woollard. I look forward to seeing this week's beautiful creation.  


If the "next" button link is not working or you would like to see a full list of participants then you can hop over to our host Cathy Proctor where you can see a full list of tonight's participants.

As always if you live in Australia and would like to know more about Stampin' Up! or would like to purchase some of the products then click on the Facebook tab at the top of the page and send me a message.

As always enjoy your week.

Theresa

Monday 23 October 2023

AWH Heart Of Christmas Week 12


Welcome to Week 12 of the Art With Heart, Heart of Christmas. This year we will be hopping weekly, so hopefully we can provide you with some festive inspiration. Our host for this year's blog hop is the lovely Sharon Davern. 

This week, probably much to our host's dismay, as she is the Queen of the fancy fold, I have gone back to a standard "non fancy fold" card, featuring very traditional festive colours. 


The starting point for my card was to stamp multiple images of one of the sprigs from the Joy of Noel stamp set using Tuxedo Black and then colour them with Old Olive and Cherry Cobbler Stampin Blends.

Next I die cut a piece of White card using one of the Deckled Circle dies. Now that I have completed the card I have no idea why I used that die in fact any die? On this white card I stamped what I would call a filler stamp, in Versamark and then embossed it in white rather than just leaving the white card plain. You can see it a bit closer in the photo below.


Next step was to arrange the coloured sprig pieces that have also been die cut, into a wreath shape and then stick them to the embossed white card. 

For the base of the card I have used a piece of Joy Of Christmas DSP and embossed it using the Christmas Tidings embossing folder. I actually like how the embossing has allowed some of the white core of the paper to come through. As you can see in the photo below.


For interest I decided not to adhere the whole wreath but to place the edge of it off the card front and then cut the side portion off.

I have also added some pine needle sprigs behind the wreath. These have been made by die cutting some Old Olive Card using one of the Christmas Classics dies and sponging the edges using Mossy Meadow ink. 

The sentiment is from Celebrate With Tags and has been white embossed on Real Red card and then die cut using one of the Cheerful Daisies dies. 

As I had an extra sprig coloured and cut I added it to the inside of the card for interest. 


Next on tonight's blog hop is the lovely Tina Gillespie. Click on the button below and it should take you to her blog where you can see her Inspiring Festive creation.


If the button link is not working or you would like to see the entire list of participants go to our lovely host Sharon Davern's blog , where I am sure you will see a much more incarcerate fancy fold

 If you live in Australia and would like to know more about Stampin' Up! or to purchase products from me then click on my Facebook button above and send me a message and I would be more than happy to help.

Enjoy your week.

Theresa